
Can a £69 Robot Arm work with a World-Class Brain? EP.1
Road-Testing Gemini Robotics-ER 1.5: The How and the Plan!

For my birthday this year I’m giving myself something gloriously impractical: a £69 acrylic robot arm and Google’s newest robotics “brain.” Yesterday, Google DeepMind made Gemini Robotics-ER 1.5 available to developers via the Gemini API—an embodied-reasoning model that looks through your camera, understands the scene, plans multi-step tasks, and calls tools to get things done. It’s positioned as the high-level orchestrator: the model that can read a messy desk, decide what “tidy up the markers into the tray” actually means, and sequence the steps to make that happen.
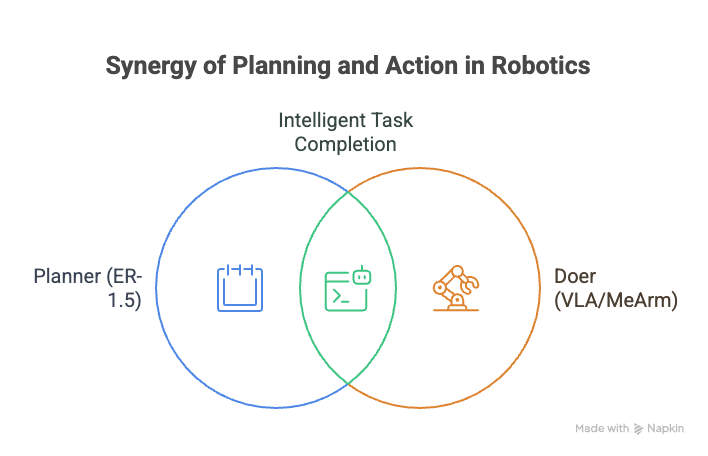
The way Google frames it is “planner + doer.” ER-1.5 is the planner: it performs spatial/temporal reasoning, breaks down long-horizon goals, checks progress, and can even consult the web for rules (“what goes in recycling here?”). When it’s time to move, it can call either a VLA (“Gemini Robotics 1.5”) or any third-party/user-defined functions—like the tiny API I’ll expose for my MeArm (move_to, grip, home). That clean separation is why I can pair a budget arm with a state-of-the-art brain and still do something interesting.
Crucially, ER-1.5 outputs precise 2D spatial signals—points and boxes for objects/parts—normalized coordinates I can ground to my desk with a simple homography and then feed to the arm’s controller. Google’s robotics docs and quickstarts show exactly this pattern: pass an image + prompt, get back labeled 2D points, and use those to act. I’ll start there, then iterate.
So that’s the birthday project: turn natural-language instructions into safe, repeatable motions on a sub-£69 robot arm, publish the prompts and code.
What I’m Testing (and Why)
I want to know if a budget robot arm + a single webcam can follow natural-language instructions reliably when you put a modern “planner” model in charge. Google just opened Gemini Robotics-ER 1.5 to developers via the Gemini API; it’s intentionally designed as a high-level brain that looks at the camera feed, understands the scene, breaks a goal into steps, and calls tools/functions exposed (like move_to and grip) until the job is done.
How the Robot and the Google Model Come Together
This is the high-level wiring that I have in mind of the whole system. My Mac runs a small control app that reads a top-down Webcam, sends the image and prompt to the Gemini ER Client, then receives ER’s plan and spatial targets. We ground those points via Homography Mapping and expose a thin Robot Tool Adapter (home, move_to, grip). On the cloud side, Google AI → Gemini ER Planner performs the perception-reasoning-planning loop (optionally consulting Search Tool for rules) and hands back the plan. The Robot Stack stays simple: the micro:bit firmware drives the servo driver + MeArm to execute motions. Clean separation: planner in the cloud, tiny APIs locally.
, Google AI (Gemini ER Planner, Search Tool), and Robot Stack (Microbit Firmware, Servo Driver and MeArm). Arrows flow left-to-right: Webcam → Control App → Gemini ER Client → Gemini ER Planner → back to Homography Mapping → Robot Tool Adapter → Microbit Firmware → Servo Driver and MeArm; Gemini ER Planner optionally connects to Search Tool.")
The right-hand lane shows the one-time calibration: print a board, capture a few images, compute camera intrinsics, place markers, and compute the homography H from image space to table XY. The left lane is the runtime loop: capture a frame, call ER 1.5 with image + prompt, receive normalized 2D points (y,x 0–1000), convert to pixels, map via H to table coordinates, enforce safety, issue tool calls (move_to/grip), send serial to the micro:bit, move servos, then re-check progress with a fresh frame. That loop repeats until ER declares success.
 lists a vertical chain: Webcam frame → Call ER 1.5 → Get 2D points y,x → Convert to pixels → Map pixels to XY with H → Apply safety limits and choose step → Tool calls move_to or grip → Serial to micro:bit or controller → Servo motion → Progress check new frame (loop back to “Call ER 1.5”). CALIBRATE panel lists: Print chessboard/ArUco → Capture calibration images → Compute camera intrinsics → Place markers on tabletop → Compute homography H to map image to table XY.")
This sequence shows the agentic loop in action. The user states a goal. The Mac app captures a frame and sends image + thinking budget to Gemini ER. ER replies with 2D targets and a step plan. The app maps pixels → table XY and enforces soft limits. ER then calls tools through our adapter: move_to(x,y,zFixed) and grip. The micro:bit drives the servos. After each step, the app captures a progress frame and asks ER whether to continue, adjust, or stop. The loop ends with a summary and a success signal.
: User goal to App; App captures frame from Webcam; App sends prompt + image + thinking budget to ER; ER returns 2D points and step plan; App maps pixels to table XY and sets zFixed/safety; loop: ER calls tool move_to; Tool sends serial MOVE x y z to Microcontroller; Microcontroller drives servos; App captures progress frame from Webcam and sends to ER; ER replies with next step or success; App outputs final summary.")
Test Plan - “Pen-in-Cup”
Prompt: “Point to the green pen and the cup. Return [y, x] in 0–1000. Then plan steps to move the pen into the cup.”
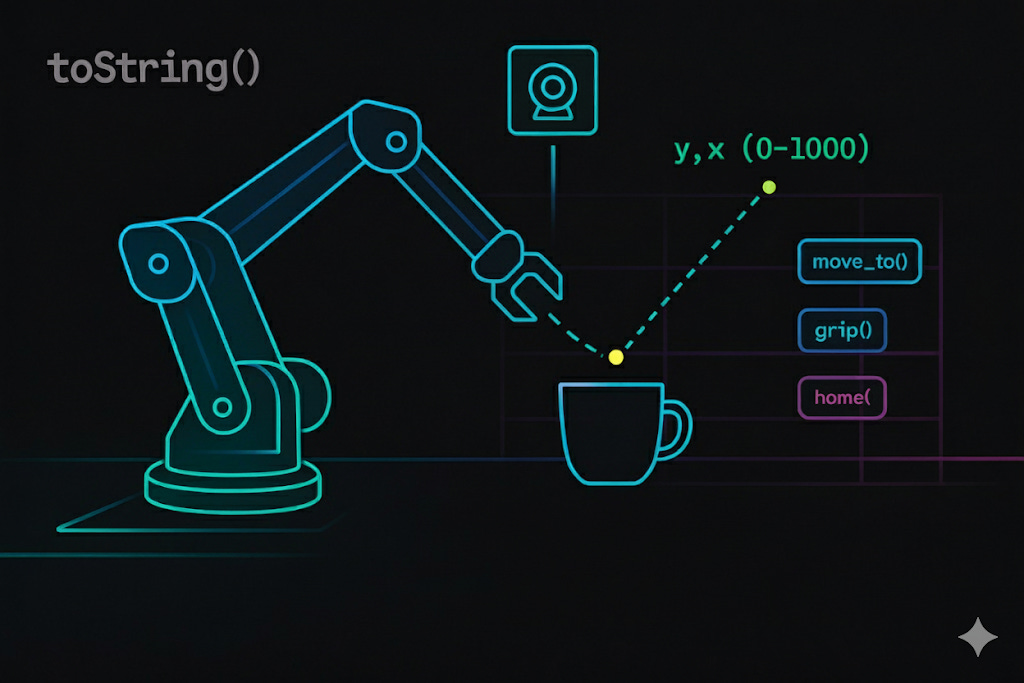
Flow: webcam frame → ER-1.5 → JSON points → XY mapping → move_to() / grip() calls → execute.
Success criteria:
Placement success ≥ 8/10 trials.
Final pen tip within.
No collisions or servo stalls across 10 trials.
Latency budget: ≤ 2.5 s per perception+plan call at “short” thinking budget; document accuracy delta when increasing the budget.
What’s left to do
✅ Pick hardware + budget (MeArm, micro:bit, webcam, power).
✅ Define tests & success metrics (Pen-in-Cup first; tidy-to-tray next).
✅ Design control shim (home, move_to, grip over serial).
☐ Assemble MeArm and verify servo range/soft limits.
☐ Mac setup (Gemini ER client, notebook, logging).
☐ One-time calibration (intrinsics + homography H for the tabletop).
☐ Wire the runtime loop (frame → ER → 2D points → XY → tool calls).
☐ Instrumentation (latency, success/failure, error in mm).
☐ Safety pass (E-stop, speed caps, workspace fences).
☐ Run 10× Pen-in-Cup trials at two thinking budgets and chart results.
☐ Record short clips
Next episodes in this mini-series
Setup & Safety — unbox, assemble, wire, calibrate; ER quickstart; homography explained with one diagram.
First Trials: Pen-in-Cup — prompts, loop, logs; compare short vs medium thinkingBudget (latency vs reliability).
Reliability Tuning — soft limits, waypoints, grasp tweaks; what improved success to ≥8/10.
Generalize: Tidy-to-Tray — multi-item sequence, progress checks, simple failure recovery.
Upgrades (optional) — smoother PWM driver, basic ROS bridge, or a depth add-on; what each buys you.
Wrap-up & Code Drop — lessons learned, full parts list, notebook + micro:bit sketch, what I’d do differently.
What desk task should I try after Pen-in-Cup—something tricky ? Reply with ideas and I’ll queue them for Episode 4.
Sources & Product Pages
Google Developers blog — ER-1.5 overview & examples (2D points, tool calls, thinking budget, safety; Gemini API in preview).
MeArm Kit for micro:bit product page (contents, price, micro:bit required).